Voyager Receiver Configuration
Voyager Receiver Remote Programming Guide

Quick guide for setting up a MASTER REMOTE, adding additional remotes, identifying the MASTER REMOTE, and erasing receiver memory on Voyager receivers

1. Learning the MASTER REMOTE
(For new or erased receivers)
Ensure power is connected to the Voyager receiver.
Press and hold any button on a Nova remote for at least 5 seconds.
The RED LED will illuminate and trigger the gate.
The first remote learned becomes the MASTER REMOTE.
Important:
• Clearly mark the MASTER REMOTE, as it is required to add more remotes.
Please note the LED light indication in the image below:
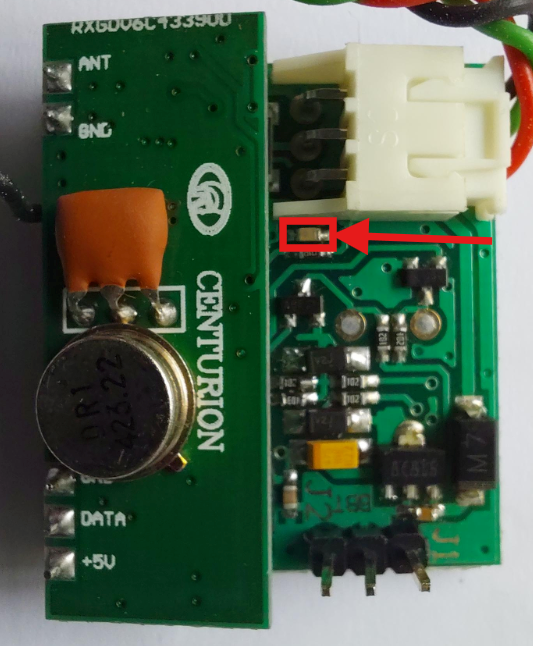
Please note the LED light indication in the image below:
2. Learning Additional Remotes
Press and hold any button on the MASTER REMOTE for approximately 10 seconds (or until the RED LED flashes 10 times).
Release the button to enter LEARN MODE.
While the RED LED remains ON, press the button on the new remote to program it.
The receiver exits LEARN MODE after 10 seconds of inactivity.
3. Lost MASTER REMOTE
Identifying the MASTER REMOTE:
• Press a button on the remote while observing the RED LED.
• The MASTER REMOTE will cause:
One long flash
Followed by one short flash
If Lost:
• The receiver memory must be erased before a new MASTER REMOTE can be programmed.
• All remotes will need to be re-learned.
4. Erasing Receiver Memory
Link jumper J1 or J2 with the middle pin.
The RED LED will flash 11 times.
Remove the link after the 11 flashes while the LED remains ON.
The receiver memory will be erased.
The RED LED will turn OFF once complete.
Please take note of the programming pins shown below:
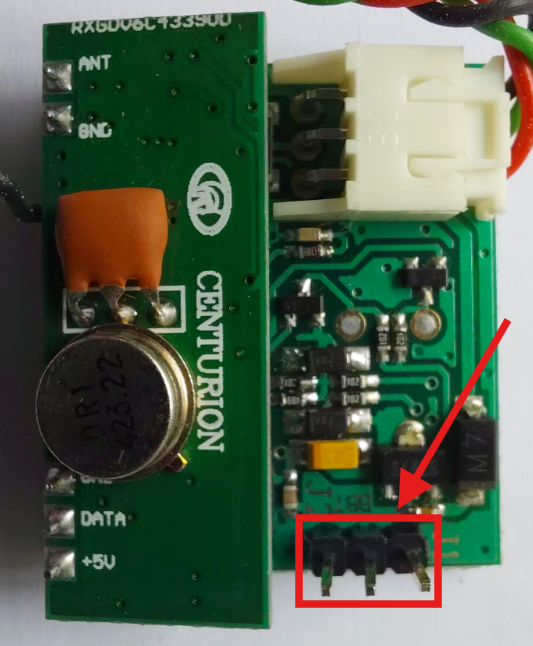
Please take note of the programming pins shown below:
Important:

• Erasing memory removes all programmed remotes.
Please feel free to reach out to us on our WhatsApp Support line at 083 650 4010 should you require any further assistance.
Related Articles
How to connect an external receiver to fully open and close the gate via remote button (trigger gate) on the D5 EVO.
Kindly follow the wiring diagram below to fully open and close the gate via remote button using an external receiver (TRG).Nova Voyager Manual
Auto Close Configuration for SMART and SMART Plus Operators
How to Activate Auto Close on SMART and SMART Plus Operators Summary Auto Close automatically closes the gate after it has been opened and the preset Auto Close time has elapsed. This feature improves security by ensuring the gate is not accidentally ...D5 Evo/D10/D10 Turbo Configuration Guide
Please find attached the installation manual for the D5 Evo/D10/D10 Turbo, which includes the following sections: Commissioning the system Setting up additional features Menu navigation map Diagnostic LED's Buzzer feedback Electrical setup ...How to wire a External receiver to an Centurion D3 SMART sliding gate operator
The below is a diagram of a external receiver wired to a Centurion D3 SMART sliding gate operator. This configuration will allow for gate activation on trigger and/or pedestrian inputs of the gate operator using a external remote. Here are the ...